Showing posts with label water. Show all posts

Friday, November 16, 2012

Eggless Passionfruit Cupcakes无蛋百香果蒸蛋糕

 Actually I am having so much fun with Aspiring Bakers theme this month. This "steaming" theme had made me digged for my recipes, of which some are "fun with colors", while the rest are healthy versions.

I had bought the recipe book in JB last weekend, and this book caught my attention, Eggless Cakes & Cookies,  无蛋糕饼, by Chef Jamie Jong. I flipped through the pages and found the recipes quite interesting... So "it" came back home with me...
 Sharing this wonderful recipe I had found inside, it was actually a Green Tea Steamed Cupcake, but I do not have green tea powder at the moment. So I had subsituted with Passionfruit and added a tsp of vanilla essence to enhance the cupcakes flavor.
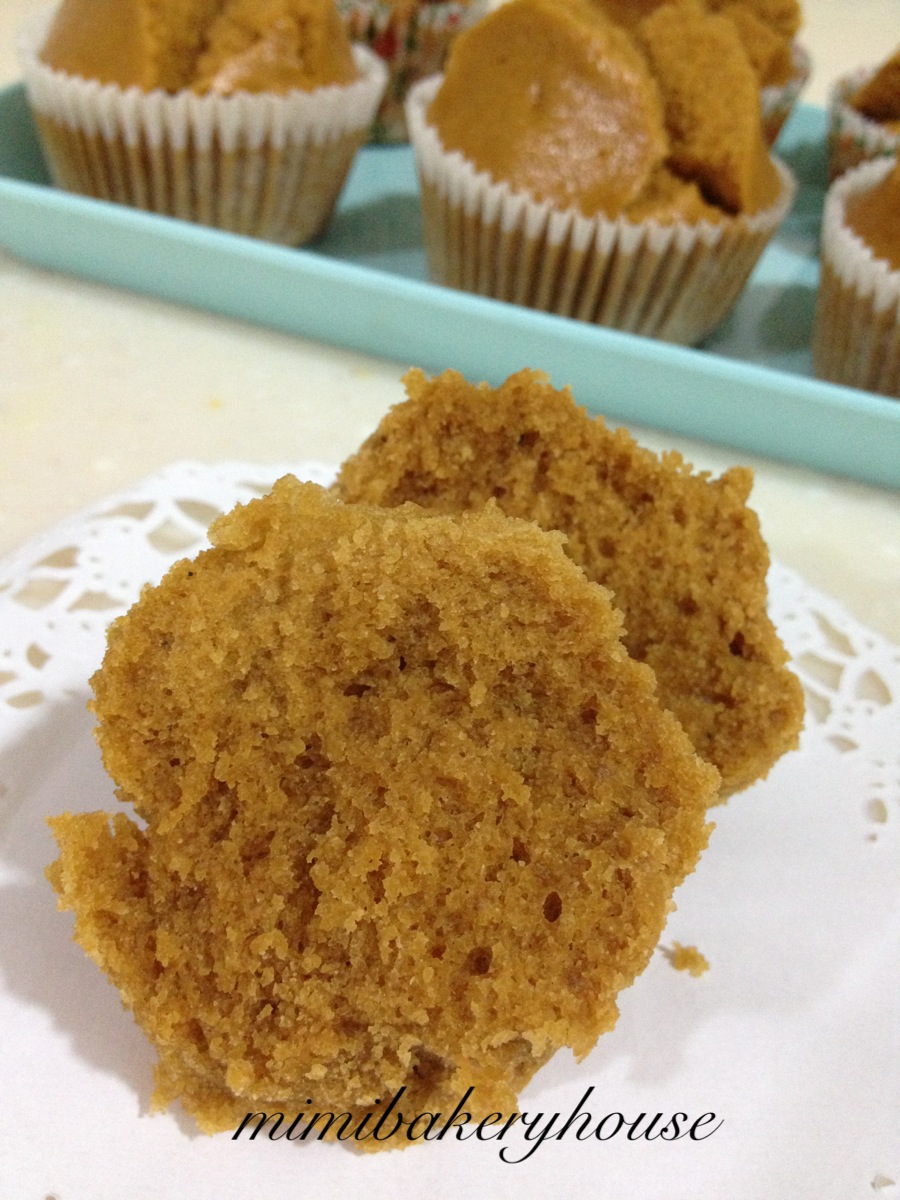
 These steamed Passionfruit Cupcakes were excellent. No eggs used, plus margarine, it made these cupcakes so healthy... The cupcakes texture was very soft and spongey. Some of the top "huated" part almost dropped out when I was taking them out of the steamer... hehehehe...
 If you could see the fluffiness in this picture...
We all liked it very much.. mostly importantly, it is a healthy cupcake:-D
Recipe as adapted by Jamie Jong, 无蛋糕饼.

Ingredients:
320g self raising flour
1 tsp baking powder (can be omitted)
150g sugar
160ml water
130g margarine
1 passionfruit pulp, about 50g-100g
(1 tsp vanilla essence optional)

Method:
1. Combine sugar, water & margarine in a sauce pan, stir over simmering water till smooth. Set aside and let it cool.
2. Make a well in the centre of the sieved flour+baking powder, pour the liquid mixture slowly and mix till well blended.
3. Pour mixture into paper cups about 80%, steam for 12-15mins.

I am submitting this to Aspiring Bakers #25 – Steaming Hot Cakes (November 2012) hosted by Miss B of Everybody Eats Well in Flanders. 

Thursday, November 15, 2012

Steamed Huat Kueh 蒸发糕

Not alot of people these days like to eat Huat Kueh. I know it will probably be the older folks whom will like this kueh. For me, I do quite like it. What about you? Well, in fact, I found out that some of my colleagues and friends actually do like this Huat Kueh as well. What a surprise...:))
I used to have an excellent recipe for Huat Kueh too, but I seemed to have misplaced it when I moved house couple of years back... So I was waiting to see if I will ever come across a similar recipe which I vividly remembered what are the ingredients that were being used. Browsing in FB in the Baking Wonderland, I finally saw this recipe, and I decided to give it a try...
Yes, this recipe was excellent. It has given the Huat Kueh a very smooth and moist texture. We all liked it very much. Homemade Huat Kueh, or rather should I say, homemades will always be the best:-D
Steamed Huat Kueh 蒸发糕
食谱来自黄薇瑜
250g 黑糖 palm sugar
400g 自发面粉 self raising flour
300ml 椰浆奶 coconut milk
100ml 水 water

Method:
1。将黑糖和面粉过筛混合 Sift the palm sugar and flour together。
2。把椰浆和水倒入混合。Mix coconut milk and water together。
3。把第2步骤加入第1步骤混合均匀。Pour coconut mixture into the flour mixture,mix until well combined。
4。把面糊倒入纸杯 80%满,切个"X"在面糊上,蒸15-20分钟。Pour batter into cupcake case, cut a "X" on the batter and steam for 15-20 mins。

For better fragrant, I think we can boiled the coconut milk, water & palm sugar over low heat to enhance the taste.
I am submitting this to Aspiring Bakers #25 – Steaming Hot Cakes (November 2012) hosted by Miss B of Everybody Eats Well in Flanders. 

Wednesday, November 14, 2012

Orange Cheesecake (Non-Baked)

I have never fancied adding orange essence into my cakes somehow as I do not like the taste of it. It seems to make me feel like as if I was taking those very bitter medicine when I was young... Hahaha... But to others, this orange essence was rather pleasant to them and in fact they do quite like it. How about you?
Reason of baking this cheesecake was because I have a pack of whipping cream which is due to expire soon. So I found this cheesecake using whipping cream... Hmmm but all ended up quite a mess as the whipping cream that I bought, did not whipped up as my top whipping cream...
In fact, being a non-baked cheesecake, this cheesecake is very easy to prepare and it should be ready by 15-30mins time.
I probably had exceeded the amount of whipped cream and I put in 250g of cheese instead of 200g. Thus the texture of the cheesecake was abit soft, more of like a mousse texture. Overall, it was quite yummy. My hubby had taken 2 slices of it, and my friend say it was delicious too. And she said she like the "orangey" taste of it:)
Ingredients as adapted from Kevin Chai.

Base:
140g crushed chocolate marie biscuits
70g melted Butter

Combine all ingredients. Press into a 7" square tin.

Cheese Filling:
200g cream cheese
70g sugar
2 tsp gelatine
2 tbsp water
200g fresh whipped cream
3 tbsp orange compound

Beat cream cheese and sugar until smooth.
Melt gelatine with water over simmering water. Add into cheese mixture until blended.
Fold in whipped cream, add in orange compound, mix well.
Spread cheese filling into prepared tin.

Topping:
80g crushed marie biscuits
40g melted butter

Combine all ingredients and sprinkle over the top.
Wrap well and refrigerate until set.

Sunday, October 28, 2012

Swan Cream Puffs / Cream Puffs

I know I am always late... late for my postings...
Seeing my fellow baking friends whom had already baked cream puffs in September for the Bake-Along theme, Lena  and Mui, both of them had also attempted on the swan puffs. When I saw their puffs, I was envy, admiring how beautifully their swan puffs had been baked.
Recently, I had also saw some FB bakers, baking these swan puffs too... So pulled up my socks and started my challenge once again!!!!
These swan puffs recipes were adapted from Kevin Chai's. His recipe had stated 3-4eggs..., so I had used only 3eggs. I guess it would have been better to use 4eggs instead, as my batter was rather thick and it did not had the smooth, sateen feel...  Ended up the cream puff texture was abit tough, but overall was quite alright... :-D
So let me try 4 eggs in future...:-D
As I couldn't buy the instant custard cream, I had use the vanilla cream that I had used for the Hokkaido Cupcakes.
So how did I fare for these swan puffs?
Recipe as adapted from Kevin Chai's Dainty Desserts
Puff Ingredients:
200ml water
25ml fresh milk
80g butter
1/4 tsp salt
1 tbsp sugar
170g high protein flour(cake flour)
3-4 eggs

Method:
1. Combine water, milk, butter, salt and sugar. Bring to boil.
2. Add in flour, use a wooden spoon, vigorously stir over medium heat until mixture leaves side of pan. Remove from heat.
3. Beat the dough in a mixer until cool completely. Add in eggs, one at a time, beating well after each addition until smooth and satiny.
4. Spoon dough into piping bag and pipe out a big rosette and swan's head & neck. Bake in a preheated oven at 180C(200C) for 25mins. Leave to cool.

Custard Ingredients:
100g instand custard powder
120ml fresh milk
200g fresh whipped cream
1/2tsp vanilla essence

Method:
Stir instant custard powder with milk, then combine with the whipped cream and vanilla essence until well-combined.

To assemble, cut the puff into half, trim the top layer to form wing shape and fill the bottom layer with custard.
Garnish with fruits, wings and head.
Dust with icing sugar.

Have fun:-D

Sunday, October 7, 2012

Passionfruit Chiffon Cake

I have been so lazy... I haven't been baking for probably a month... Been feeling too relaxed with my holiday to Bangkok last month, and busy waiting for my next one in November to Taipei... Gosh am I so excited!!!!

Today I suddenly got the mood... The mood to bake... hehehehe...
And here we have, a Passionfruit Chiffon Cake!!!
 I have already wanted to make one but I hadn't had much chance to buy the passionfruit till my colleague helped me bought a pack of them from the supermarket..:))
 So these passionfruits are compliments from my colleague, Carol... :-p
(pardon my passionfruits as I has left them too long in the fridge, thus the "wrinkled"skin)

And to my surprised, this passionfruit chiffon cake was awfully delicious!!!! 
The sour taste of the passionfruit had complimented well with the whole chiffon...
  And they are sooooooo soft & fluffy....
But this chiffon cake ain't my girls' favorite as there are "seeds" inside the chiffon cake... hahahaha....

Recipe as adapted from
Fruity Cakes by Alex Goh

Ingredients:
(A)
4 egg yolks
50g sugar
1/4tsp salt
50g canola oil
50g passionfruit pulp
20g water
(B)
100g cake flour
1/2tsp baking powder
(C)
4 egg whites
100g sugar
1/8tsp crream of tar tar

Method:
1. Mix (A) until well blended. Add in (B), and mixed well until well combined.
2. Whisk egg whites in (C) until soft peak forms. Add in cream of tar tar & sugar. Continue whipping until stiff.
3. Take 1/4 of the egg white meringue from Step 2 and mix with the mixture in Step 1 until well combined. Add in the remaining meringue and fold until well blended.
4. Pour the batter into a 22-cm chiffon tin and bake at 170C for about 40-45mins.
5. Immediately invert the cake tin after removing it out from the oven and let it cool completely.

Hope you will like this Passionfruit Chiffon Cake as much as I do:-D
Have fun!!!