Showing posts with label kueh. Show all posts

Thursday, November 15, 2012

Steamed Huat Kueh 蒸发糕

Not alot of people these days like to eat Huat Kueh. I know it will probably be the older folks whom will like this kueh. For me, I do quite like it. What about you? Well, in fact, I found out that some of my colleagues and friends actually do like this Huat Kueh as well. What a surprise...:))
I used to have an excellent recipe for Huat Kueh too, but I seemed to have misplaced it when I moved house couple of years back... So I was waiting to see if I will ever come across a similar recipe which I vividly remembered what are the ingredients that were being used. Browsing in FB in the Baking Wonderland, I finally saw this recipe, and I decided to give it a try...
Yes, this recipe was excellent. It has given the Huat Kueh a very smooth and moist texture. We all liked it very much. Homemade Huat Kueh, or rather should I say, homemades will always be the best:-D
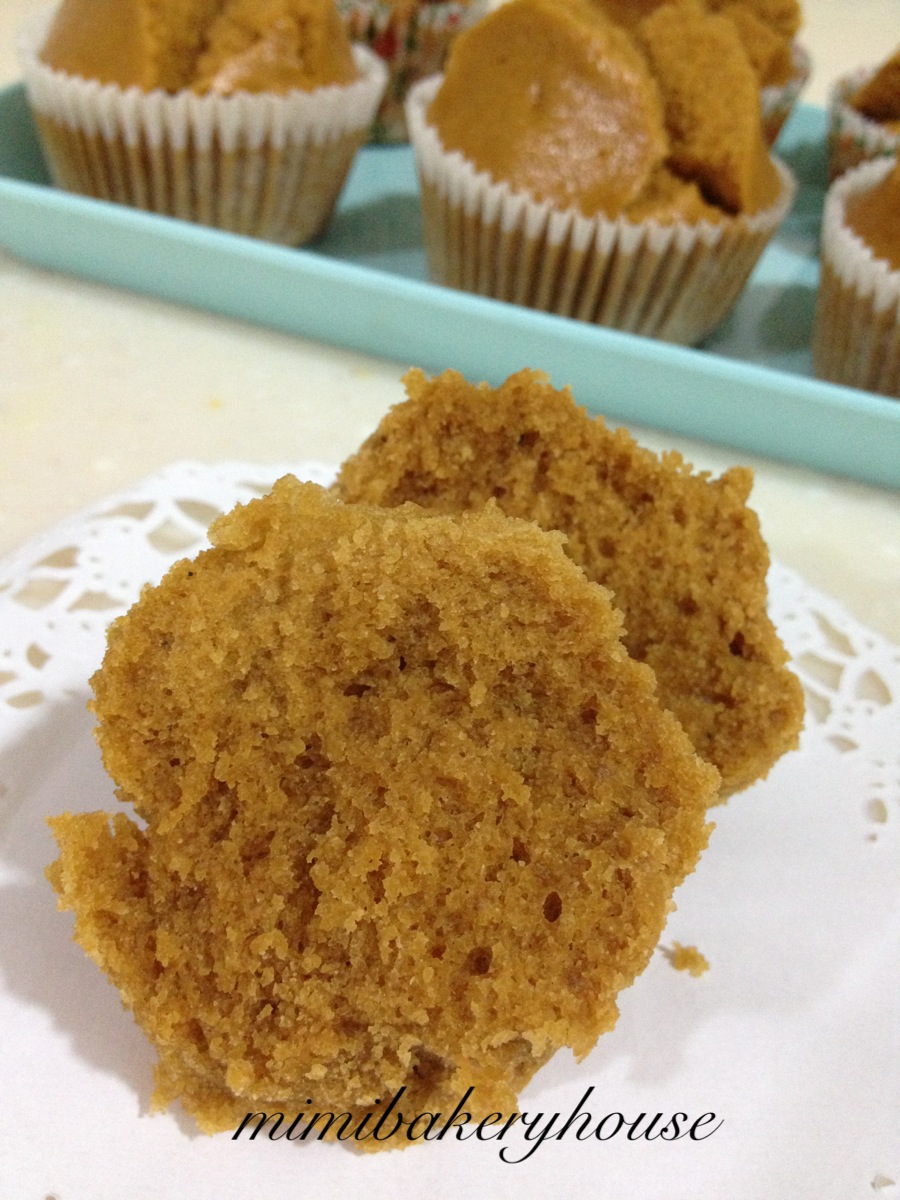
Steamed Huat Kueh 蒸发糕
食谱来自黄薇瑜
250g 黑糖 palm sugar
400g 自发面粉 self raising flour
300ml 椰浆奶 coconut milk
100ml 水 water

Method:
1。将黑糖和面粉过筛混合 Sift the palm sugar and flour together。
2。把椰浆和水倒入混合。Mix coconut milk and water together。
3。把第2步骤加入第1步骤混合均匀。Pour coconut mixture into the flour mixture,mix until well combined。
4。把面糊倒入纸杯 80%满,切个"X"在面糊上,蒸15-20分钟。Pour batter into cupcake case, cut a "X" on the batter and steam for 15-20 mins。

For better fragrant, I think we can boiled the coconut milk, water & palm sugar over low heat to enhance the taste.
I am submitting this to Aspiring Bakers #25 – Steaming Hot Cakes (November 2012) hosted by Miss B of Everybody Eats Well in Flanders. 

Monday, March 5, 2012

Chinese-Style Carrot Cake

The last time when I tried making the English Carrot Cake, my hubby wasn't too keen on it and he said he will rather, preferred the Chinese style. I had actually tried making this carrot cake last Saturday, but it turns out to be a flop as I had used glutinous rice flour instead of rice flour.

Well, blurred me... I was wondering what did i went wrong, and why didn't the cake become a cake...? Until I went to browse through the recipe again and realised that I had used the wrong flour... heheheh... :-D


Chinese-Style Carrot Cake

It has been almost a year since I made the yam cake and it was delicious too. So this time, this carrot cake was no exception, I had put in too much ingredients as usual...

I had received good feedbacks from my family, friends and colleagues too:-D
Ingredients:
1 Radish, shredded
1 bowl of dried shrimps
6 dried mushrooms, sliced thinly
6 shallots. diced
some olive oil
1 bowl of rice flour (abt 200g)
2 bowls of water

Method:
1. Mix the flour with the water, make sure it is not lumpy.
2. Fry the shallots in oil, followed by the dried shrimps and mushrooms. Add in the radish and fry until it is fragrant.
3. In the the flour mixture, stir until you get a sticky and lumpy texture. Place it into a tin ans steam for about 30-45mins, or until you get a cake texture.
4. Garnish with spring onions and toasted sesame seeds.

Saturday, October 29, 2011

Min Jiang Kueh

Mummy Eileen had once again sent me a very simple recipe to do these Min Jiang Kueh...

Are these your favourite too? It wasn't mine though, but I guess hubby quite like them.

So after Mummy Eileen sent me the recipe, I told her, "OK, I will do them now."


Min Jiang Kueh


It is also very easy to make.

And most of all, it is Min Jiang Kueh!!! :-D

Ingredients:

130g plain flour

1/2 tsp baking soda

1/2 tsp yeast

1 egg

25g sugar

160ml water

Method:

Mix all ingredients together to form a smooth batter.

Leave it aside for 30 mins.

Pour batter into a non stick pan, smooth out to get an even thickness.

Cook on low heat for about 6-8 mins.

Remove from pan, spread your fillings. Fold into half and serve.


All time favourite Muah Chee

My friend had sent me a picure of her muah chee she just made...

She said these muah chee are really easy to make, and most importantly, they are soft and yummy!!! She told me to try making them...


Why not...???


MUAH CHEE


This is the first time I make these muah chee, and I wasn't sure how it will turn out...

Well, not too bad isn't it...???

It was indeed very easy to make them and easy to manage with.

I had always thought that making muah chee is a very tedious job.

Guess it's not!!! :-D


Thanks to Mummy Eileen for such a good recipe to keep! ^-^ Ingredients:

110g glutinous rice flour

140ml water


Adequate peanut powder

(this I bought the ready made ones from the supermarket)


Method:

Mix the flour and water together to get a smooth batter.

Pour the batter over a non-stick pan coated with oil.

Cook under very low heat for about 3 mins.

Once the batter has set, it should roll together to form a lump. Toss for a while to ensure it is totally cooked.

Remove and put onto peanut coating, cut to bite size.


Friday, October 21, 2011

Onde-Onde 班兰糯米球 (Glutinous Rice Balls)

ooooo.... Onde-Onde is also one of my favourtie kueh kueh...

I always like the feeling of putting in the onde-onde inside my mouth and try to pop out the sugar syrup out... It is just a wonderful feeling... Don't you??? :-p


Onde-Onde 班兰糯米球 (Glutinous Rice Balls)


Here is some of the steps of preparing the onde-onde.


How did I fair in this onde-onde attempt?

Hmmm, the glutinous wasn't that bad, it is soft and chewy.

Well, as for the sugar syrup part, when I pop the onde-onde into my mouth, either I did not taste the sugar or you still can feel the whole bits of sugar in it...

Duh... so, in this aspect, I had yet to master the skill...

But being a first attempt, this recipe is not too bad, easy to make.


Hope you will have fun in trying out this recipe.:))


Ingredients:

250g glutinous rice flour

200ml pandan juice

100g grated white coconut (steam w some sea-salt)

250g palm sugar (finely chopped)

few drops of pandan paste


Method:

1. In a large mixing bowl, place in flour, add in the pandan juice little by little and knead well till it form a smooth pilable dough.

2. Pinch a small amount of dough(abt size of a calamansi lime), roll it in your palm to form a smooth ball. Make a well int he centre of the dough and fill it with chopped palm sugar. Pinch dough to seal, roll into ball again.

3. In a pot of boiling water, drop the balls in the shimmering pot and when it floats, remove with a slotted spoon and allow excess water to drip off.

4. Drop the balls gently on the grated coconut and coat it evenly, then transfer to a plate to serve.


Kueh Lapis Kukos 九层糕 (9-Layer Cake)

I had tried the 三层糕previously, and it was quite a good attempt. The kueh was really tasty.

Nat loves it as well and she had asked me to make the 九层糕.

I decided to take up this challenge:-p


Kueh Lapis Kukos 九层糕

It was rather easy to make these九层糕, no fuss at all, but it's just that I have to divide the batter into 9 portions.

I have half the amount of the recipe, and used a rectangular tin inside of a 11"x11" square tin as recommended.


If you might have noticed..., my九层糕is actually 8 colors instead of 9 colors...

A couple of reasons actually:

1. I have half the recipe.

2. I had use a slight bigger rectangular tin, thus my portion wasn't enough.

3. I had lost count of my colors... :-p


And also, I had left out orange color, plus I couldn't get the RED RED color as those 九层糕 that was been sold outside... So that why my top layer was orange, instead of RED....


I thought I had everything controlled, dividing the portion into 9 portions... But I was so wrong.... And also I had also forgot the colors I had already poured in...

Blur Blur Blur me.... hehehehehe....

The kueh was really, and perhaps it was the colors of the kueh, Mimi likes it very much but she just want to try it...

My own colorful 九层糕....

Texture of the 九层糕....????

It was almost the same as the 三层糕,but just that the layers can be peeled off:-D


Here is the recipe:

600g fine sugar (I used 500g)

1 litre coconut milk

1 litre water

1 tsp sea-salt

few pieces of pandan leaves

350g rice flour

350g tapioca flour


Method:

1. Mix fine sugar, coconut milk, water, salt, pandan leaves and bring to boil at low heat till sugar dissolved. Discard the pandan leaves, turn off the flame & allow to cool slightly.

2. In a large mixing bowl, mix the rice flour & tapioca flour. Then add the coconut milk mixture, whisk slightly till well blended.

3. Divide batter into 9 portions. Ready to steam layer by layer, by adding in desired colors into each layer such as white, green, yellow, pink, blue, orange, with the final top layer red.


Sunday, October 16, 2011

Kueh Talam Pandan 打南班兰糕点

Kueh Talam has always been a all-time favourite kueh for me.


I love the soft texture of the kueh, and the smell of coconut.....


Kueh Talam Pandan 打南班兰糕点


Ok, the recipe has called for 绿豆粉(Green Pea flour). I hadn't seen any Green Pea Flour as yet, and I happened to see my girlfriend make a cookie using green pea powder. So I asked her if she bought the green pea powder, she said she grind it herself.

I have ran out of the 绿豆粉(Green Bean Flour), so I decided to try using the green pea powder instead...:-p


A disastrous maybe....???

LOL.....!!!!


Alright, just ignore me... Here is the recipe:


Ingredient:

Green Layer

60g rice flour

20g tapioca flour

20g green pea flour (绿豆粉) (I used the grind Green Pea Powder :-p)

175g sugar

125ml pandan juice

250ml water

1/2 tsp alkaline water

(I added about 1 tsp of pandan paste to enhance the taste. But perhaps you can add a few drops of green coloring to the mixture to make it more greener.)

Method:

Combine rice flour, tapioca flour & green pea flour, mix it with sugar.

Add pandan juice, water, alkaline water, mix it well till smooth. Cook it under a double-boiler till almost thickens, then pour into a 6"x6" square tin and steam for 20 mins.


Coconut Cream Layer

30g rice flour

30g green pea flour(绿豆粉)

250ml coconut milk

1/4 tsp salt

(I do not have the green bean flour, so I used 50g of rice flour instead)

Method:

Combine the rice flour, green pea flour & salt into a double boil pot.

Gradually add in coconut milk & stir well till smooth. Cook it under a douible boil until thickens, then transfer to the tin and pour over the green layer. Steam for another 20 mins.


Allow to cool completely before cutting into pieces.


Have fun:))