Showing posts with label books. Show all posts

Sunday, November 18, 2012

Steamed Pandan Peanut Cupcakes

I have a busy weekend... I had been to SG Popular Book Fair at the Expo Hall on Saturday. But it didn't thrill me much as the cookbooks were as cheap as they were supposed to be... So yesterday, I headed down to JB and I decided to go to thier Popular Fair at Danga City Mall. I did not know where it was, but luckily the lady boss of the nail shop was kind enough to let me use her wifi to check the location. It was pretty easy to find the mall in the end. And of course I had grabbed at least 7 books which were so valued for money!!! Needless to say, my gals & my niece bought their loot as well...

Adding another steamed cupcake to the November Aspiring Baker's theme, this is a Steamed Cupcake I had gotten from Alex Goh's Steamed Cake.

These cupcakes had caught my attention as it was pandan flavor and they looked very pretty. But of course, Alex Goh put red bean filling whereas hubby suggested to use peanuts instead.
It was a little difficult to put the peanut fillings in the centre as "it" will "run" everywhere else in the cupcakes... So I had actually "dug" a hole in the centre and put in the peanut fillings, and fill them up with the remaining batter.
So, what do you think of them?
Recipe as adapted from Magic Steamed Cake by Alex Goh
(slight modifications)

Ingredients:
(A)
4 eggs
250g sugar
1/2 tsp salt
120ml canola oil

(B)
2 tsps pandan juice
few drops of green coloring
200g coconut milk
(I had used 2 tsp pandan paste instead of the pandan juice & green coloring)

(C)
400g flour
1 tsp baking soda
1 tsp baking powder
(I had omitted all and used self raising flour instead)

Method:
1. Whip A until sugar dissolves and slightly thicken. Add in B, mix until well blended.
2. Fold in sieved C, mix until well blended.
3. Pour the batter about 1/3 of the 7cm cupcake mould lined with paper cup. Steam for about 2-4mins.
4. Remove from heat and place the peanut fillings in the centre & press lightly.
5. Top with the remaining batter and steam for another 15-20mins over high heat.

Fillings can be omitted or changed to your preferred fillings like red bean paste, etc.
Have Fun:))

I am submitting this to Aspiring Bakers #25 – Steaming Hot Cakes (November 2012) hosted by Miss B of Everybody Eats Well in Flanders. 

Friday, November 2, 2012

Banana, Macadamia Nut, And Coconut CupCakes

I was browsing my blog this morning and I had saw the THB was on.. I had missed a couple of the THB bakes and I didn't want to miss this again...I had gotten ready the conversion for this bake and I had quickly prepared all the ingredients.
 For those of you whom are unaware of this THB (The Home Bakers), it is a baking club set up by Joyce of Kitchen Flavours. For Bakers whom owned a "Coffee Cakes" by Lou Seibert Pappas, and we will all be baking the same cake in each theme, sharing our experience & tips. 
If you will liked to join us along in this THB bakes, please CLICK HERE for more information.

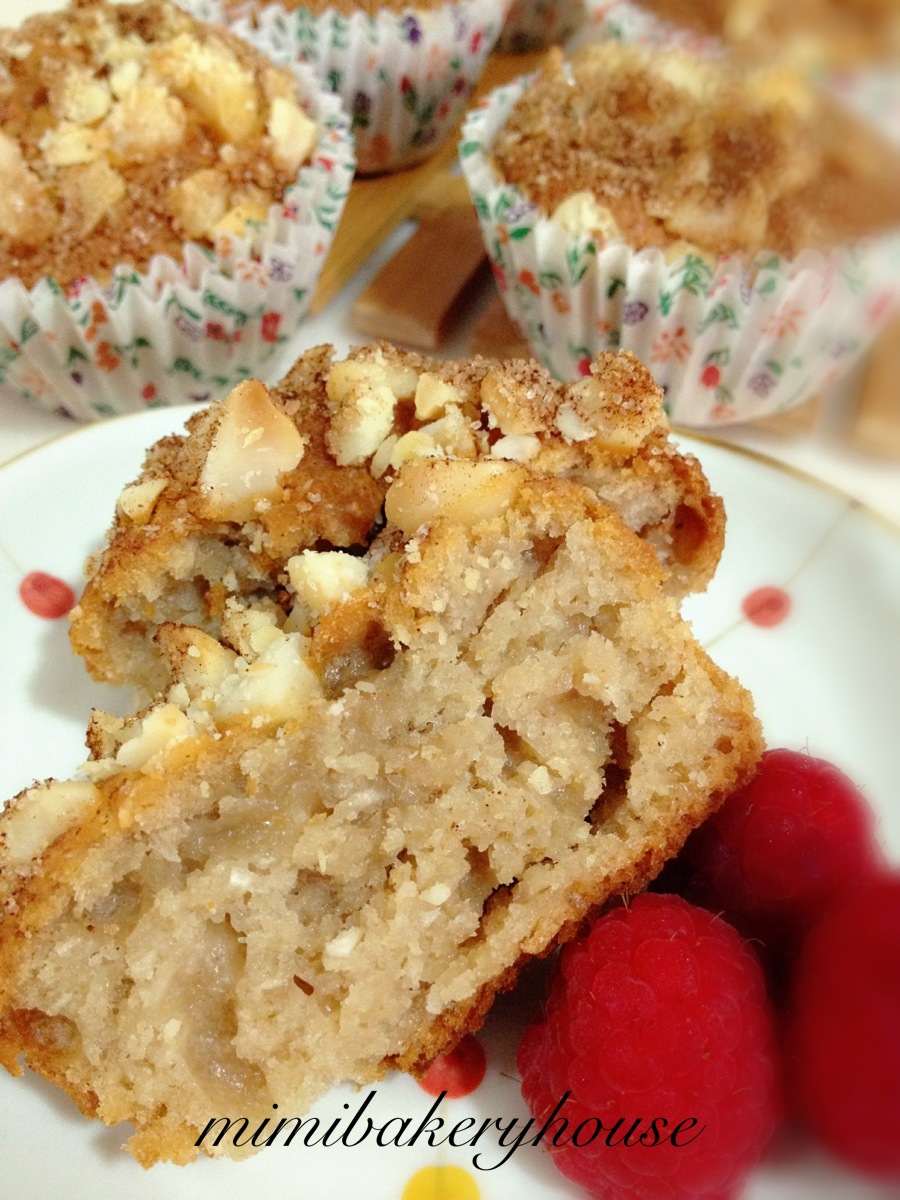
This time round, Kit has chosen this bake, and it was really delicious...
Fresh from oven today, I had made them into cupcakes instead of cake as cupcakes are easily managed(eaten), and for my small little oven, it would be definitely better as my cupcakes will be easily "cooked" rather than cake form...:-p
 Followed all stated in the recipe, I had blended all the wet ingredients using my blender. Mixing everything in with the flour, and oh, I have used dessicated coconut instead of the flakes. Just before pouring the batter into the cupcake cases, I realised I had forgotten to add in my oil with the wet ingredients...!!! Oh my... Thank goodness, the cucpakes were still edible... hehehehe, silly me...:))
As you can see, I was still able to get a very moist nice texture of the cupcakes. The best part of the cupcakes, were of course the macadamia nuts topped with the cinnamon sugar... So crunchy & yummy:))
Would you like to have one too?

Please visit Kit from I-Lost-In-Austen for the full recipe.
To view the others members bake on this cake, do drop by The Home Bakers (THB).

Thursday, September 20, 2012

Everyday Banana Yoghurt Cake

I guess I had been very very late in submitting my post to the Bake-Along #32... :(
I had kept reminding myself to submit this post before the deadline, but I guess I was still late...
Nevertheless, I will still like to share my bake with everyone even though I'm late.
I had a very ripe banana, so I had mashed it and mixed it in with my plain low-fat yoghurt.
Personally, I do not like this cake texture too well.  But they did go very well with the icing sugar and a little slice of strawberry...:-)

Everyday Yoghurt Cake
(Recipe as adapted from Cake Keeper Cakes, Lauren Chattman)
2 cups unbleached all-purpose flour
1-1/4 cups sugar
1 teaspoon baking powder
1/4 teaspoon baking soda
1/4 teaspoon salt
1 cup plain whole-milk yoghurt or lowfat yoghurt
(Additional 1 ripe mashed banana)
1/3 cup vegetable oil
2 large eggs
2 teaspoons pure vanilla extract
confectioners' sugar
  1. Preheat the oven to 350F. Grease the bottom and sides of a 9-inch round cake and dust it with flour, knocking out any extra. Whisk together the flour, sugar, baking powder, baking soda, and salt in a large mixing bowl. Whisk together the yoghurt, oil, eggs and vanilla in a medium mixing bowl. Pour the yoghurt mixture into the flour mixture and stir until just moistened.
  2. Scrape the batter into the prepared pan and bake until the top of the cake is light golden and a toothpick inserted into the center is clean, about 40 minutes.
  3. Let the cake cool in the pan for about 5 minutes, invert it onto a wire rack, and then turn it right side up on a rack to cool completely. Dust with confectioner's sugar, then slice and serve.
  4. Store uneaten cake in a cake keeper or wrap in plastic and store at room temperature for up to 2 days.

Tuesday, August 14, 2012

Blueberry Walnut Cupcakes (Strawberry Coffee Cake)

Hehehehe, I am back again... My boss is back in Korea for the next 2 weeks, so my timing is more flexible now till Sep...:-D I think I had missed quite abit in the Bake-Along since then... And I hope I am not too late in baking this Strawberry Coffee Cake in The Home Bakers.
This time I had chosen to use blueberries instead, reason being, the strawberris ain't in season plus they are more expensive than the usual days. And almost I have 3 strawberries monsters at home, so keeping my 2 punnets of strawberries for them seem to be a wiser choice for this time. It's kinda weird too, blueberries seem to be expensive too, cos usually it will be like 2 punnets for about $4.00..? When you want the berries, you can't find them... Murphy's Law... hahahaha....
Besides replacing the strawberries, I had used walnuts instead of chopped almonds. I had used the full portion of the recipe as stated, made about 9 regular size cupcakes & a 7"x3" rectangular pan.
These cakes are indeed yummy, it's fluffy & soft. With the juicy blueberries and the toasted walnuts sprinkled with brown sugar, it really compliments very well.
Kids & Hubby didn't get to touch the cakes at all as that day I had overly stocked with alot of bread and cakes I bought from the stores. So anyhow, I had brought the girls to watch a movie, "Brave". It was a very touching story, we all loved it very much. It is a great movie to watch together with your family:)
Do click here to view the whole recipe from Alice from I Love.I Cook.I Bake.

Friday, August 10, 2012

Peach-Almond Coffee Cake & 3 lovely awards

This is going to be quite a lengthy post. And it had been quite awhile since my last bake. The weather had been rather warm these days, and it is
making me even more lazy to bake and trying out new recipes. I had been given a new assignment by my newly arrived big boss, and the past 2 weeks I had been diligently trying to keep up with him... hahaha... Well, I must say my new boss seems pretty much a good gentleman, and of course we are able to communicate:-p
Good thing is that, he is here in SG for 2 good weeks, and the other 2 weeks back in Korea. hehehe...

I must admit, I had totally missed out my baking books for the past 2 weeks that my boss was in town. And I felt quite uneasy as I hadn't been baking since... Having the "itch" to bake soon, I picked up this recipe from the Coffee Cakes. I kept some of my book collections in my office so that whenever I have free time in the office, I will browsed through my books.

Sorry Joyce, I know I should have baked the recipes from Coffee Cakes for our THB, but I really wanted to bake some quick & simple to solve my "itch" plus the hot weather... Sorry sorry...:-p
This Peach-Almond Coffee Cakes I must say is very refreshing. With the crushed almond nuts & the sprinkled sugar on the nuts, made it even more delicious. I bet serving it with whipped cream or creme fraiche will be extremely fantastic!!!
Baking this cake in my 8" springform pan.
Look at the great texture of this cake. It was really soft, with the sweet, moist peaches and the toasted almonds. This cake will be best serve warmed. I had kept the cake for 3 days and they still tasted excellent. This cake is really great for anytime of the day, and having it with a cup of tea...:)
 I had tend to reduced my sugar level in all my cakes, and basically I am using a 125g for a 1-cup sugar measurement.
Hubby had tasted a slice of it and he said it was yummy. I had brought 3/4 of the cake to the office for my colleagues to try and everyone had praises for it.
Ingredients as adapted from Coffee Cakes by Lou Seibert Pappas
(own modifications in red)
1/2cup (50g) unsalted butter at room temperature
1 cup (125g) granulated sugar
3 large eggs
1 tbsp amareto liqueuer or 1 tsp vanilla extract
1 cup (125g) unbleached all purpose flour
1 tsp baking powder
1/4 tsp salt
4 peaches, peeled, pitted, and cut into 3/8" thick slices
2 tbsp freshly squeezed lemon juice
1/4 tsp freshly grated or ground nutmeg (omitted)
1/2 cup (50g) roasted cashews or slivered almonds
2 tbsps Demerara or Turbinado sugar
Whipped cream or creme fraiche for serving (optional)

Method:
Preheat oven to 375F(180C). Butter & flour an 11" fluted tart pan with a removable bottom or a 10" springform pan.
1. In a large bowl, cream the butter & granulated sugar until light & fluffy. Add in the eggs, and amereto, or vanilla extract and beat until smooth.
2. In another bowl, combine flour, baking powder and salt. Stir to blend.
3. Mix all dry ingredients into the butter mixture, beating well until smooth.
4. Turn into the prepared pan. Toss the peaches with the lemon juice, nutmeg and arrange them on top. Sprinkle with the nuts and demerara or turbinado sugar.
5. Bake for 25 or 30 mins or until golden brown. Let it cool in the pan on a wire rack for 10 mins, then remove the pan sides. Serve warm or at room temperature, cut into wedges or slices, with whipped cream or creme fraiche, if desired.


Besides this, I had received 3 lovely awards from my newly found baking-mates I had known through Joyce, Lena & Zoe, whom 3 of them are of the Bake-Along Hosts, and of course I had made more baking-mates from The Home Bakers hosted by Joyce.
It was an honour to know all of them, and everyone out there had been a very fantastic baker & cook. I must say I really envy and admired them as they are doing such a great job in their bakes & dishes, putting their hearts into the food-works.
Applause to all these new found baking-mates that I had known.

I had received the Readers Appreciation Award from Jasline from Food is my Life.
Thank you Jasline for passing this lovel award to me. This is my 1st received award since I first started baking last April.
Another award is from Angeline from Angeline's Side of Story.
Thank you Angeline for passing this lovely award. It had been a pleasure knowing you as well.:)
And finally a last award from Zoe from Bake for Happy Kids.
Zoe, I must say it had been a great pleasure knowing you too. All of you in fact.:) Thanks for the lovely award.


And to receive all these lovely awards, I have to mention 7 facts about myself...:-p
Here they are:
1. I am actually a very lazy person whom like everything to be quick & easy. Always trying to opt for shortcuts...hahahaha...
2. My girls had always asked my which princess character I would like to be. I'd liked to be "Sleeping Beauty" so that I can sleep as and when I liked...
3. I love shopping, be it clothes, stuffs for the kids, utensils, pots, or should I say, basically I loved to shop for everything!!!!
4. I cannot drive at all, even though many of my friends told me I have a "driver's look"
5. I love to travel, especially to countries with lots of food + shopping paradise.
6. I love my big boy and my girls alot. Having them in my life is my greatest thing that could ever happened to me, though 70% of the time, they made me mad.
7. I am vain, and I like to look pretty...  hahahahaha....!!!!!

Not forgetting, I have to pass all these lovely awards to other food-bloggers. I might have to pass these awards in my next post as sleeping beauty is going to bed soon...
Night Night Everyone:)

Thursday, July 19, 2012

Mocha-Cappuccino Marbled Cake

I finally found a way to load up my pictures using my office PC... plus blogging in the office is a huge challenge for me as the blogger did not seem to function "well" in some areas... Not too sure if it was the security settings from office or...??? Kekekeke... Anyway, here I am with my cake & posting...:))
Time really passed very quickly, I had actually "prepared" myself for this cake since last week and I thought I do still have some time left before the "due" date... I baked this cake last night, not remembering that today is the date to submit our post until I saw Lena's, Joyce, Anuja's, Mich's & Emily's postings...
THB - The Home Bakers , a bakers group created by Joyce. And we will be baking all the recipes from a chosen book on every 3 weeks. For this time, they had chosen "Coffee Cakes" by Lou Seibert Pappas.
Each member from the group will be selecting one recipe from the book and only the host for the selected recipe will be allowed to post the recipe, while the rest will try to bake it and link on the host's page. Giving tips and advices on the bake, will allow everyone to learn something new.
For those of you whom like to join us in this fun bake, please do contact Joyce from THB.
This time, Lena, from Frozen Wings was the chosen one, and she had selected this Mocha-Cappuccino Marbled Cake. It was indeed a great choice as this cake was absolutely soft and moist. Not too a fussy cake to handle, everything was quickly whipped up and off it went to the oven for about 1 hour.

In fact, this is my 3rd time using my 10" bundt pan as I dislike using it. Due to the "stick" of the cake or burnt outcome, I had never fancy using it. So this time, I took my chance, greased it with butter and lightly floured, it worked like MAGIC... and I was rather pleased with the outcome for the bundt cake:-p
My 1st every nicely baked bundt cake from this bundt pan:))
Getting a nicely browned outer coat for my cake I would say... Don't you think so too??
While the cake was baking in the oven, the aroma of the coffee lingers around the house.... Absolutely not a coffee lover at all, it was a temptation... I kept checking on the cake to see if it was ready to be EATEN!!! The cake was almost done by 45mins, but I let it continued baking for another 15mins to make sure it was fully baked.
Coffee wise, I had used as indicated, reduced the amount of sugar and replacing sour cream with low-fat yoghurt.

Results of the cake was good. Hubby actually came back to the kitchen to ask for another slice... And Nat liked this Mocha-Cappuccino Cake as well. As for me, I thought it was a little bland...??? Maybe my sore throat has caused me lost my taste buds for the time being...:-p
Do try this if you are a coffee lover:)

Wednesday, July 18, 2012

Coca-Cola Chocolate Cake

How about having Coca-Cola inside your Chocolate Cake???

Hubby tried the cake, and he asked me, " Are you sure there is Coca-Cola taste in this cake??? Are you pretty sure???"
I wasn't that sure if Coca-Cola was "present" in the chocolate cake... hahahaha... Hubby said it tasted more like normal chocolate cake instead...:-p
I hadn't been baking since last Wednesday as I had been sick through the week. Kids gotten the flu virus as well... Quite a hectic week after all... Hadn't had much energy to do any baking but the mind n hands are itching to do so.... I was "talking" to Joyce yesterday and asking her for her opinions for some baking books from Donna Hay and Okashi. So I found from Joyce that Donna Hay did have her website loaded with plenty of recipes. I will try them out soon.... There are simply so many of them that we had wanted to own and seriously these baking/cookery books ain't cheap at all. We will go slow... hehehehe....
Back to my cake... I realised that I had  threw my Cake Keeper Cake book aside for a while, so last week, I took it out and I came across this interesting bake, Coca-Cola Chocolate Cake. Hmmm, well, I thought, why not, lets try this cake... Maybe the kids will like it very much since there is Coca-Cola inside...???
This cake might not seem as pretty nor appetizing as it looks, probably due to the dark color, it looks kind of a "muddy" feeling:-p The ingredients were rather basics, and plus the fact that, you can just use a whisk and a wooden spoon to mix up all the batter. Quick, simple & easy...:))
But surprisingly, texture of this cake wasn't too bad... It was rather soft and moist as you can see... Hmmm, Coca-Cola wasn't detected in the cake... hehehehe, really more like a moist chocolate cake instead:-p
This batter was enough for a 8" springform round pan. And I had brought almost the whole cake to the office and the cakes were gone by the early morning of the day... So, I guess, this cake was good after all.
Another thumbs up to Cake Keeper Cakes Book:)
Recipe as adapted from Cake Keeper Cakes

Ingredients:
 (with slight modifications, using a 8" round springform pan+ a small rectangular pan)
1 3/4 cup all purpose flour (220g cake flour)
1 cup granulated sugar (100g)
1 cup packed light brown sugar (100g)
3/4 cup unsweetended Dutch process cocoa powder (85g)
2 tsp baking powder
1/4 tsp baking soda
1/4 tsp salt
2 large eggs
1 cup sour cream (200g)
1/2 cup oil (100ml)
1 cup Coca-Cola (235ml)
1 tsp vanilla extract
Confectioner's sugar for dusting (omitted)

Method:
1. Preheat oven to 350F (175C). Grease the inside of a 9" round springform pan.
2. Whisk flour, sugar, light brown sugar, cocoa powder, baking powder, baking soda & salt in a large mixing bowl.
Whisk together the eggs, sour cream, oil, Coca-Cola, and vanilla in a medium mixing bowl.
3. With a wooden spoon, stir the Coca-Cola mixture into the flour mixture until just combined. Do not overmix.
4. Pour the batter into the prepared pan. Bake until a toothpick inserted in the centre of the cake comes out clean, 55mins to 1 hr.
5. Set the pan on the wire rack and let cool for 5mins. Run a paring knife around the perimeter of the pan to loosen the cake from the pan sides, and release the sides. Using a large spatula to slide the cake from the pan bottom to a wire rack. Let it cool completely. Dust heavily with confectioner's sugar, cut into wedges, and serve.
6. Store uneaten cake in a cake keeper or wrap in plasctic & store at room temperature for up to 3 days.

Saturday, June 23, 2012

Pear Pinwheel & Hazelnut Cake

I was browsing Joyce's blog, Kitchen Flavours that day, and I came across this little badge on her blog.

THB - The Home Bakers , a bakers group created by Joyce. And we will be baking all the recipes from a chosen book on every 3 weeks. For this time, they had chosen "Coffee Cakes" by Lou Seibert Pappas.
Each member from the group will be selecting one recipe from the book and only the host for the selected recipe will be allowed to post the recipe, while the rest will try to bake it and link on the host's page. Giving tips and advices on the bake, will allow everyone to learn something new. That's all:))
So here I am, joining them in this group, to try out all the recipes from this book. I ordered mine from Fishpond. So far I had baked 2 of the recipes, and I do quite like the cakes. Pretty unusual ones and yet delicious.
For this post, this is actually the 4th bake for this book, and I managed to bake in just in time before the deadline.. Hmmm, school holidays will be over by this weekend, and I think I am trying to bake as much as I can within this week. Schools start and I will have lesser time to bake as I need to supervise Nic's homework, and plus the girls need to go for the enrichment class. Good bye holidays and back to the hectic school life... :-p

Alright, back to the main point... The Pear Pinwheel Hazelnut Cake will be host be Zoe, Bake for Happy Kids. Do click on her link for the recipe.
I had used almond meal instead of hazelnut. As for the pears, I had bought them from the supermarket, and it was called "Blush" Pears?? Not too sure, but the pretty colors on the pears did caught my attention, so here they are with me, ready to be baked into this lovely cake.
Batter's all ready, with the sliced pears arranged as pinwheel. I had used a 20cm round pan, coated with butter. Well, in fact, this is my 2nd time coating my pan with butter. And then only I realised that, it was so much easier to do so, plus it is definitely cheaper than using the parchment paper. :-p
As my cinnamon powder had longer expired, I did not get any new ones. So what I have now is the ginger powder. So with a dash of the ginger powder + the confectionery sugar, I tossed them up with the pears before arranging the on the batter. Taste wise still ok... hehehehe....
I had made a half portion of the original recipe. Do refer to Zoe's blog for the exact recipe.
Overall about this cake : it was really tasty. A soft, moist, nutty texure.

It does reminds me of the Pear & Frangipane Pie I made last year, using the almost same ingredients, but the difference was that it was on a "pie" version. It tasted as good as this Pear Pinwheel & Hazelnut Cake too:))
Hope you do have fun trying out this recipe.:))

Saturday, May 5, 2012

Bake Along #23 Honey & Walnut Cake

Joining Bake Along #23 again with the favourite Cake Keeper Cakes recipes, Honey & Walnut Cake.
I had never baked with honey before and I was a little worried that this cake might be abit too sweet... Who knows, the cake turns out quite well, and in fact, this is my 1st cake that did not erupt on the top:-p

This is what I meant, a smooth round top after my cake was being baked... I was very pleased with it... hehehehe... My 1st ever smooth top...:-D
I guess this was the 1st time that I had ever followed the recipe temperature's guide...oops! :-p
Ok Ok, let's get back to this Honey & Walnut Cake... Recipe stated that honey will burnt out faster and it might brown the top. But for mine, I think it still looks pretty alright to me... Perhaps, when I was putting in the honey, I had actually miscounted the number of spoons of honey that I had added in... I must be getting old and forgetful... haha!!! So this cake might contained the actual amount of honey as required, otherwise, it is under-ed honey...
This cake has a very soft, moist texture. Sweetness is just right. I was quite impressed with the combination of this cake.
The only thing about it was that, I do not own a food processer to grind the walnut till fine powdery texture. I had use a hand-held blender instead, but it seems to be clotting up as in chunks as the walnut released oil upon grinding... So while mixing the walnut into the flour mixture, I had to mix it well, to release the crumbs. But nevertheless, this cake turns out fine. I am still able to taste the teeny weeny bits of the wanuts.
The testers had some opinions. For some of us, we love this cake very much, with its soft, moist texture, and the combination was just right for us. And for the rest, it wouldn't be a cake that they will want to eat again as they find it is too sweet:-p
So what would your choice be? Do try out this wonderful cake, and perhaps, it might be one of your favourite too?
Ingredients:
1 1/2 cups walnut pieces
1/3 cup sugar
1 cup unbleached all purpose flour
1 1/2 tsp baking powder
1/4 tsp salt
3/4 cup unsalted butter, softened
6 tbsps honey
3 large eggs
1 tsp grated lemon zest
1/2 tsp vanilla extract
confectioners' sugar

1.Preheat the oven at 350F. Grease a 9 inch round cake tin. Line the bottom of the pan with parchment paper. Grease the parchment , dust the sides of the pan and parchment with flour. Spread the walnuts in a single layer on a baking sheet and toast until fragrant, 8-10 minutes. Let cool completely.
2. Combine the cooled walnuts and 1 tbsp of sugar in the bowl of a food processor and process until the nuts are finely ground. Add the flour, baking powder, salt and pulse to combine.
3. Add the buttter, honey and remaining sugar to a large mixing bowl and beat on medium high speed until smooth, about 2 minutes, scraping down the sides of the bowl . Beat in the eggs, one at a time, scraping down the sides of the bowl after each addition. Beat in the zest and vanilla. Add the nut flour mixture, 1/2 cup at a time and mix until just incorporated.
4. Scrape the batter into the prepared pan and smooth with a spatula. Bake until a toothpick inserted into the center of the cake comes out dry, 35 to 40 minutes. If the cake starts to brown too much around the edges, loosely tent with foil after 25 minutes.
5.Let the cake cool in pan for 10 minutes, invert it onto wire rack and then turn it right side up again to cool completely. Dust heavily with confectioners' sugar before cutting into wedges and serving.


Here, let's join along the Bake-Along hosts, Joyce, Lena & Zoe, and other bakers whom had join along in this bake too:)

P.S: I have seen everyone's bake piece, but sometimes I am just not able to leave a comment in your blog to let you know how wonderful your bake piece looks too...
So sorry...:(

Monday, April 23, 2012

Chocolate Marble Chiffon Cake

We had fell in love with the chiffon cake from Cake Keeper Cakes... Not only my family, my colleagues loved them as well... This book is definietly a keeper!!!

And today, we have a Chocolate Marble Chiffon Cake. I thought this cake might be a thrill to the girls as they will preferred something light and simple. Looks like it did, and so do US!!!! As usual, I was over fascisnated by my 9" chiffon, and the nicely chiffon that came out from the oven, + the swirl of the cake, the taste & texture... hehehe...

After baking the Banana & Macadamia Nut Chiffon Cake, I decided to try baking the Chocolate Marble Cake. Something simple.... Yes, it turns out so well and it was surprisingly as good as the previous chiffon that I had baked!!! Thumbs up!!!


Probably I did not make a very nice swirl, but it still taste yummy:-D
The texture of this chiffon was extremely moist, soft & spongy.... When you bite on the cake, you might kinda heard the hissing sound of the sponge, too exaggerating perhaps...??? hehehehe!
Nat wasn't quite keen on the cake when she tasted it, but later on she came out for more helpings. She had even told me not to finished the cake, and asked me to kept some for her to bring to school... I was glad that everyone loves this cake.

*Using 9" tube pan
*Measurements in grams are in my own measurements

Recipe adapted from the Cake Keepers Cake:
Ingredients:
2 tbsps + 2 tsps cocoa powder
2 tbsp water
1 1/2 cup sugar (175g sugar, 125g-50g)
1/2 cup vegetable oil (100ml canola oil) + 1 tbsp oil
1 1/3 cup cake flour (165g cake flour)
2 tsp baking powder
1/2 tsp salt
7 eggs, 5 separated, 2 whole
1 tsp vanilla extract
1/4 tsp cream of tar tar

Method:
1. Preheat oven to 325F(165C).
2. Whisk together the cocoa powder, water, 1 tbsp sugar & 1 tbsp oil in a small bowl. Set aside. Combine flour, baking powder & salt in a bowl. Set aside.
3. Place egg yolks and whole eggs in a large mixing bowl and beat on medium high speed until lightened in color, about 3 mins. With the mixer still running, add in 1 cup of sugar (125g) in a slow, steady stream and continue to beat until the mixture is light and increased in volume, about 5mins longer. With the mixer still running, slowly pour in the oil and continue to beat for 1 min longer.
4. With the mixer on low speed, add in 1/3 of the flour, then 1 tbsp water. Repeat with the remaining flour & water, ending with the flour. Stir in the vanilla.
5. With clean beaters and using a clean mxing bowl, whip the egg whites on the medium speed until forthy. Add cream of tar tar and continue to beat on medium speed until the egg whites begin to turn white. With the mixer still on medium speed, pour in the remaining 1/2 cup sugar (50g) in a slow, steady stream and whip until the whites hold stiff peaks.
6. Fold in 1/4 of the yolk mixture into the egg whites to lighten. Then fold the whites into the yolk mixture, gently but thoroughly.
7. Transfer 1/3 of the batter into another bowl and gently fold in the chocolate batter. Pour half the yellow batter into the tube pan. Top half of the chocolate batter. Repeat with the remaining yellow & chocolate batter. Smooth the top with a rubber spatula. Use a butter knife to swirl the batters together, taking care not to overmix. Bake the cake until it is golden brown and the top springs back with you touch it, 55 mins to 1 hr.
8. Remove the pan from the oven. Invert your cake and let it cool for about 2 hours.
9. Remove cake for the pan. Slice & Serve.
** Cake can be store at room temperature for about 3 days.
 
Looking forward to try out new recipe from the Cake Keeper Cakes soon:-D