Showing posts with label cupcakes. Show all posts

Monday, November 26, 2012

Durian Cupcake 榴莲杯纸蛋糕

Again, my friend Eileen had given me another recipe to try. This time she say these durian cupcakes were delicious and I must try them. It was really so tempting... Durian.... Nat loves durian as well, so she was up for this recipe, and so did hubby. We had went to the market to buy some durian, but thinking the durian are made for baking, I did not buy those top quality ones. Perhaps the quality of the durian will somehow affect the taste of the durian cupcakes. I had previously baked a Durian Cake last year, this will be my 2nd attempt. This recipe came from Wokking Mum, and I made some modifications to the ingredients.

The durian cupcakes had given a very nice fragrant while they are in the midst of baking. Cupcakes rosed very well, had a nice browning top. I had added more of the durian as I will prefer a heavy taste. Texture of the cupcakes were excellent, soft & fluffy, except that I find them abit dry and too dense at the bottom, probably I hadn't mashed the durian properly:-p I will think to add some milk to soften the texture in my next attempt. Let's see how it goes.


Ingredients:
(I have used half of the recipe, using 200g durian flesh, margarine, 2 eggs, self-raising flour)
250g Mashed Durian Flesh (original was using 170g)
250g Butter
150g Castor Sugar (original was using 180g)
5 Eggs
240g Flour, sifted (Plain/All purpose)
2 teaspoon Baking Powder, sifted

Method:
  1. Cream butter and sugar til light fluffy.
  2. Add one egg at a time and continue beating.
  3. Add in durian gradually and beat for 2 1/2 minutes.
  4. Add in flour and baking powder.
  5. Mix well.
  6. Pour batter into a greased and lined 25cm X 25cam baking tray. ( I baked in 6' rectangle tin and muffin cups)
  7. Bake at 180C for 40 to 50 minutes or till cake is done (check using toothpick).

Thursday, November 22, 2012

Oh dear!!! I found little chicks on my egg tray!!!!

Check your egg tray too!!! Have you found any little chicks hatched just like mine???
I had saw these little egg cakes baked in Baking Wonderland. I was pretty amazed by them as they were so adorable. I decided to try baking them myself. Keeping the egg shells for a couple of weeks, I finally tried this recipe on Monday after I got back home from work. Mimi was so cute, she went to the egg tray and told me, "Mummy, the chicks come out already"
Here is how I baked my "eggs". Cracking the top corner of the shell. Washed them thoroughly, and make sure the inner white "lining" of the shell were being removed. Before using them, it is best to boiled them over boiling water for about 5 mins to kill any bacteria.
Here we have, after baking... The tedious part was peeling off the egg shells... which I detest... hehehe...
My niece was here over the week, so she got a chance to try all the bakery that I had attempted these past few days. Nat on the other hand was very keen on the "egg cake". She loved them so much, and had 4 of them. She told Mimi not to eat the balance 4 eggs as she would like to keep them for her breakfast tomorrow, and she did:-D
Ain't these little chickys so adorable.... Do try them, they are really quite fun & interesting. And the kids will be so thrilled as well. Even my hubby had said the "egg" look so cute after putting on the "eyes" & "beak", and its "hair... hahahaha
Here is the recipe as adapted from YeeWennie Yap from Baking Wonderland.

Recipe yields about 12-15 eggs, depending on the size of the egg shells

Ingredients:
2 eggs(room temperature)
39g sugar
35g plain flour(sifted 3x)
18g canola oil
1 tsp vanilla essence

Method:
1. Beat the eggs & sugar until white and fluffy, using high speed.
2. Add in vanilla essence and continue beating for another 2 mins.
3. Fold in the sifted flour, mix well.
4. Add in the oil and mix until well-blended.
5. Pour the batter into a piping bag and pipe the batter into the egg shells about 3/4 full. Gently knock on the egg 2-3 times.
6. Bake in a preheated oven of 180C for about 20mins or until "egg" is baked.
7. Remove from oven, set aside to cool. Once cool, gently peeled off the shells.
8. Decorate the "chicks". I used chocolate emulco for the eyes and strawberry paste for the beak.

Catch these little chicks before they run away.....

Monday, November 19, 2012

Chocolate & Coffee Cupcakes

Recently Nat had a change of taste bud... Suddenly she just like coffee flavor. Amongst my 3 gals, she is the one who has an exotic taste, like enjoying durian, coffee, enjoying even red wine & beer... Hmmm, that's pretty unusual for a little girl though...
Nevertheless, she had been quite supportive of the bakes that I had tried, and she will always be the one whom is willing to try, unlike Mimi, who used to "test" my cakes, simply just tell me these days that those cakes are not her favourite.. :-p

These Chocolate & Coffee Cupcakes were quite tempting.. Being chocolate & coffee..
But I guess I didn't fare quite well on these cupcakes.
Firstly, I felt that my chocolate flavour wasn't too much
Secondly, the coffee smell was there but not too satisfying to me
Thirdy, my cupcakes came out abit hard
... ...
But the consolation was, the coffee cream was yummy!!!!
I used my own combination of the whipped cream + instant coffee mix, and topped with chopped peanuts!
hahahahahaha.....
If I hadn't mentioned those cons, these cupcakes would look extremely fantastic isn't it???
Recipe as adapted from Kevin Chai:

Ingredients:
250g butter
180g sugar
4 eggs
200g plain flour
1 tsp baking powder
1/4 tsp baking soda
150g melted chocolate
2 tbsp canola oil
30ml kahlua

Method:
1. Beat butter & sugar until fluffy. Add in eggs one at a time, beating well after each addition.
2. Fold in sifted flour, baking powder & soda.
3. Stir melted chocolate with canola oil, then pour into flour mixture with kahlua, mix well.
4. Spoon the mixture into the cases. Bake for 20mins in a preheated oven of 175C. Remove cupcakes & cool on a rack.

Coffee Cream:
200g butter
150g icing sugar
1 tsp instant coffee powder
100g melted chocolate

Prepare the cream by beating butter, icing sugar and coffee powder until light & smooth. Stir in melted chocolate and pipe on top of each cupcake. Decorate with chocolate.

Sunday, November 18, 2012

Steamed Pandan Peanut Cupcakes

I have a busy weekend... I had been to SG Popular Book Fair at the Expo Hall on Saturday. But it didn't thrill me much as the cookbooks were as cheap as they were supposed to be... So yesterday, I headed down to JB and I decided to go to thier Popular Fair at Danga City Mall. I did not know where it was, but luckily the lady boss of the nail shop was kind enough to let me use her wifi to check the location. It was pretty easy to find the mall in the end. And of course I had grabbed at least 7 books which were so valued for money!!! Needless to say, my gals & my niece bought their loot as well...

Adding another steamed cupcake to the November Aspiring Baker's theme, this is a Steamed Cupcake I had gotten from Alex Goh's Steamed Cake.

These cupcakes had caught my attention as it was pandan flavor and they looked very pretty. But of course, Alex Goh put red bean filling whereas hubby suggested to use peanuts instead.
It was a little difficult to put the peanut fillings in the centre as "it" will "run" everywhere else in the cupcakes... So I had actually "dug" a hole in the centre and put in the peanut fillings, and fill them up with the remaining batter.
So, what do you think of them?
Recipe as adapted from Magic Steamed Cake by Alex Goh
(slight modifications)

Ingredients:
(A)
4 eggs
250g sugar
1/2 tsp salt
120ml canola oil

(B)
2 tsps pandan juice
few drops of green coloring
200g coconut milk
(I had used 2 tsp pandan paste instead of the pandan juice & green coloring)

(C)
400g flour
1 tsp baking soda
1 tsp baking powder
(I had omitted all and used self raising flour instead)

Method:
1. Whip A until sugar dissolves and slightly thicken. Add in B, mix until well blended.
2. Fold in sieved C, mix until well blended.
3. Pour the batter about 1/3 of the 7cm cupcake mould lined with paper cup. Steam for about 2-4mins.
4. Remove from heat and place the peanut fillings in the centre & press lightly.
5. Top with the remaining batter and steam for another 15-20mins over high heat.

Fillings can be omitted or changed to your preferred fillings like red bean paste, etc.
Have Fun:))

I am submitting this to Aspiring Bakers #25 – Steaming Hot Cakes (November 2012) hosted by Miss B of Everybody Eats Well in Flanders. 

Saturday, November 17, 2012

Steamed Chocolate Cupcakes

Yes, Steam Cakes are indeed in trend this month in my home... And I am enjoying it very much. I had given alot of steamed cakes to my friend, and her hubby mentioned that I seemed to be enjoying doing so... So I told my friend, this month onwards my daughter will be starting her school vacations, plus my boss is not in SG, so taking all these time available to bake again...

I had bought this "Steamed Cakes" recipe book when I was in Penang last October, but I had never tried any of the recipes since I bought it till today.
From this book, I had selected the Steamed Chocolate Cupcakes as the ingredients were rather basic. Some of the other recipes required evaporated milk and condensed milk, which I wasn't too keen in them.
A full ingredients could actually fetch quite a number of cupcakes, depending on the size of your paper cups.
*Note: It is better to use those "paper" cupcake cases as compared to the other cupcake cases as the paper cups will "opened" up during steaming.
These steamed chocolate cupcakes were not too bad. I had modified some of the ingredients. Cutting down a huge amount of the icing sugar, using margarine instead of butter, and replacing the hot water with milk too. The cupcakes did turned out well, soft and moist, but a little not so sweet.. So perhaps I should increase a little more sugar...hehehehe...
The gals loved these cupcakes too. I was glad that they liked it. Mimi had 2 of them and she said it was yummy. My friend who tried the cupcakes said they were delicious as well.
Would you like to try one as well?

Recipe as adapted from the Steamed Cakes by Mdm Zubaidah Bte Chepa

Ingredients:
Yields about 16 medium size cups & 16 mini size cups
250g superfine flour (I use self raising flour)
1 tsp baking soda (omitted)
75g cocoa powder
350g icing sugar (I used 200g)
250g butter (I used margarine)
3 eggs
1 bowl of hot water (I used 250ml cold milk)

Method:
1. Beat butter & sugar until smooth.
2. Add in the egg one at a time, mix well at each addition.
3. Add in the flour+cocoa powder, alternating with the milk. Mix until well blended.
4. Pour batter into the paper cup cases and steam over high heat for about 10mins.
(If you are using my ingredients, you can fill the batter till full as the cupcakes will shrink a little after removing from heat)

I am submitting this to Aspiring Bakers #25 – Steaming Hot Cakes (November 2012) hosted by Miss B of Everybody Eats Well in Flanders

Sunday, November 11, 2012

Beware of these birds!!! ANGRY BIRDS are back in town!!!!

How does the Angry Birds look to you? Angry enough? Fierce enough?
But I though the black ones looked like Penguins instead... hahaha...I think I forgotten about their eyebrows huh???
 The 1st couple of birds were still quite like Angry Birds but not till Mimi came by into the kitchen and started tugging my arms, my shorts... almost lost my patience with her cos she was "destroying" my "works", so I quickly finished up the balance...
 Passable as Angry Birds???
What say you???
 I had googled for some pictures and I saw this one, so I followed the pictures and piped the batter into angry birds... Preparing yellow, red, blue, orange, black and the original colors to be "drawn".
 These are the batter before steaming....
Hmmm, they do look better at this current state rather than being steamed isn't it??? :-p
Sorry, I hadn't had any step by step pictures but I hope the method mentioned below will be cleared.^^
 Let's take a closer look at them....
The Blue Bird.
 The Red Bird.
 The Yellow Bird.
 And my 2 "Penguins", if you can noticed them... hehehehee!!!!
 My noti Mimi, can't wait to set her hands on them... She has been pestering me since the moment I told her about making Angry Birds cupcakes....
So she grabbed the Blue Bird and told me she wanted to eat the orange beak...-_-"
After I peeled the orange part for her, she just threw the rest of the bird cupcake and ran away@_@"
 Nic and Nat, trying to take pictures of the Angr Birds... They both said the cupcakes looked so pretty...
Nic didn't dare to eat any of them though, whereas Nat ate the Black Bird and she said it was delicious.
 After that, we headed off for our dinner where Mimi was caught dozing off by the window...^^
I had used the same recipe as the LadyBird Cupcakes.
Ingredients:
3 cold eggs
275g plain flour
3 tsp baking powder
150ml fresh milk
1 tsp ovalette
220g castor sugar
1 tsp vanilla essence

Method:
1. Put all the ingredients in a mixing bowl and beat with medium high speed for 6 minutes.
2. Set aside colors into piping bags:
(*amount are estimated, and can make up to 12-14 Angry Birds of the normal cupcake size)
(*as too much coloring are not too good, I have piped only the top part, leaving the base part the original flavour.)
  • Orange - 1 tbsp of batter - Beak
  • Yellow - 3 tbsp of batter - Yellow Bird
  • Blue - 3 tbsp of batter - Blue Bird
  • Black - 3 tbsp of batter - Black Bird, Eyes, Brows
  • Red of batter - 3 tbsp - Red Bird
  • Original - 2 tbsp of batter - Eye, Tummy
1st: Color the body, shape out the eye and tummy area, using either red, black, blue or yellow batter.
2nd: Color the eye area & tummy area with the original batter.
3rd: Color the beak with orange batter.
4th: Color the eye and brows with black batter.
5th: Get ready to steam at medium high heat for about 15mins.

You may wish to use my picture below as a guide to "color" the Angry Birds.

I am submitting this to Aspiring Bakers #25 – Steaming Hot Cakes (November 2012) hosted by Miss B of Everybody Eats Well in Flanders.

Friday, November 2, 2012

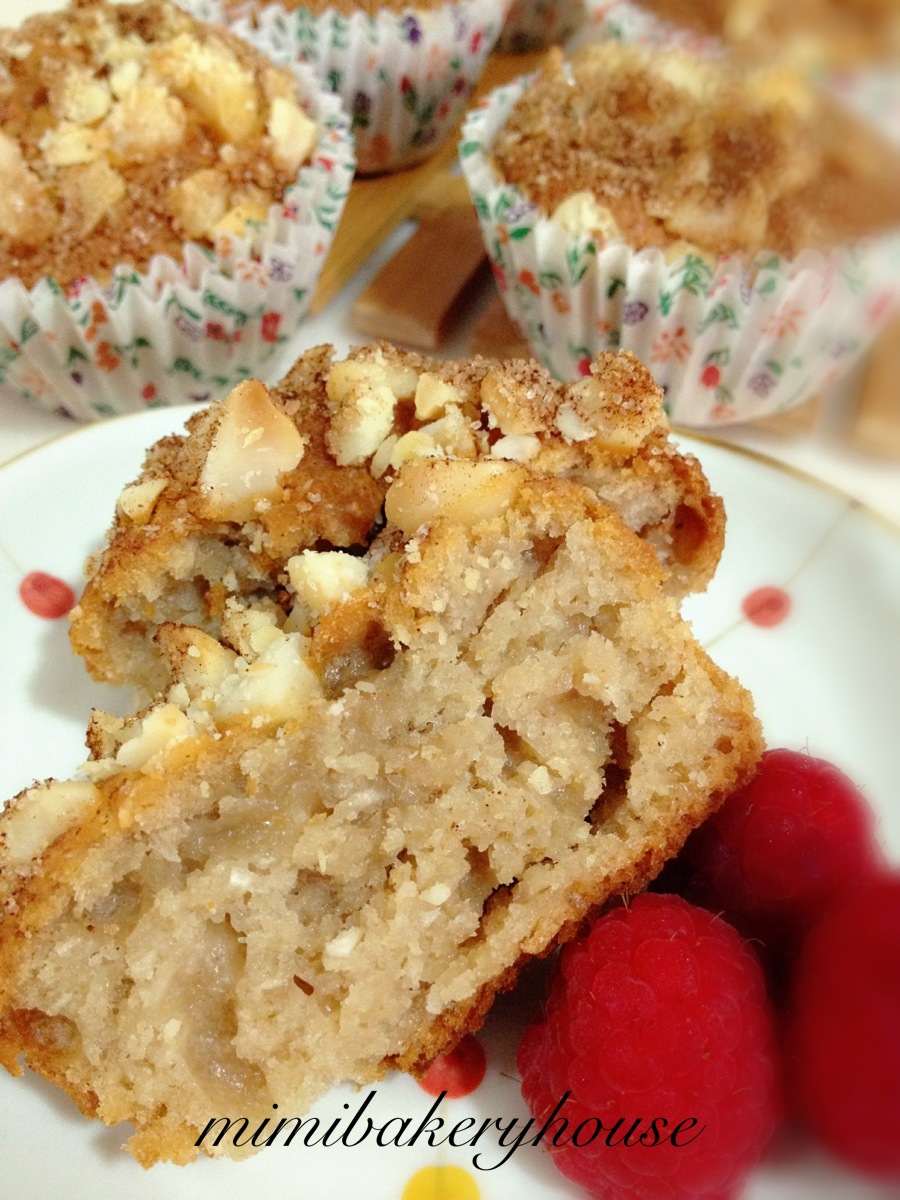
Banana, Macadamia Nut, And Coconut CupCakes

I was browsing my blog this morning and I had saw the THB was on.. I had missed a couple of the THB bakes and I didn't want to miss this again...I had gotten ready the conversion for this bake and I had quickly prepared all the ingredients.
 For those of you whom are unaware of this THB (The Home Bakers), it is a baking club set up by Joyce of Kitchen Flavours. For Bakers whom owned a "Coffee Cakes" by Lou Seibert Pappas, and we will all be baking the same cake in each theme, sharing our experience & tips. 
If you will liked to join us along in this THB bakes, please CLICK HERE for more information.

This time round, Kit has chosen this bake, and it was really delicious...
Fresh from oven today, I had made them into cupcakes instead of cake as cupcakes are easily managed(eaten), and for my small little oven, it would be definitely better as my cupcakes will be easily "cooked" rather than cake form...:-p
 Followed all stated in the recipe, I had blended all the wet ingredients using my blender. Mixing everything in with the flour, and oh, I have used dessicated coconut instead of the flakes. Just before pouring the batter into the cupcake cases, I realised I had forgotten to add in my oil with the wet ingredients...!!! Oh my... Thank goodness, the cucpakes were still edible... hehehehe, silly me...:))
As you can see, I was still able to get a very moist nice texture of the cupcakes. The best part of the cupcakes, were of course the macadamia nuts topped with the cinnamon sugar... So crunchy & yummy:))
Would you like to have one too?

Please visit Kit from I-Lost-In-Austen for the full recipe.
To view the others members bake on this cake, do drop by The Home Bakers (THB).

Sunday, October 28, 2012

Chocolate Chips Cupcakes 2

I had joined the Baking Wonderland Malaysia in Facebook, and from there, I have bookmarked lots of recipes in my phone... And I better updated those baked items into my blog before my phone is overloaded with all those recipes.

I had gotten this recipe from Michelle Heong from Baking Wonderland. These chocolate chips cupcakes were a delish! Soft texture... But 1 regret... I didn't add enough chocolate chips.. Hehehe, else it would have been heavenly delish with plenty of chocolate chips!!!

Here is the recipe:
Ingredients:
100g Butter
80g Sugar (75g)
2 eggs
120g self raising flour (125g)
1 tsp baking powder (omiteed)
20g cocoa powder
50g chocolate chips (can use more)
Adequate chocolate chips to sprinkle on top of the batter.

Method:
1. Cream the butter and sugar until well combined. Adding 1 egg at a time and make sure they are well-blended in each addition.
2. Add the flour into the mixture, mix well.
3. Gradually add in the milk.
4. Fold in the chocolate chips.
5. Pour the batter into the cupcake cases, about 80% full, bake in a preheated oven of 150C (180C) for about 35mins.

Saturday, October 13, 2012

Hokkaido Cupcakes 北海道蛋糕

I had finally made my Hokkaido Cupcakes today... These Hokkaido Cupcakes had always been a to-bake list. And I saw this recipe from Baking Wonderland, one of this baker, Ann Chin, had this Hokkaido Cupcakes, and they were so pretty... So I decided I should try this recipe asap... And here we have, my freshly baked Hokkaido Cupcakes:-D
These Hokkaido Cupcakes were simply so delicious. Thumbs up!!!!
Cake texture was really excellent, soft and it melts-in-your-mouth texture.
As for the vanilla custard cream, it was really tasty too. I have used about 1.5 tsp of the vanilla essence and it gave the custard cream a very nice fragrant.
My girls, Nic wasn't keen, whereas Nat & Mimi tried the Hokkaido Cupcakes... So what were they reactions??? Nat liked the cupcake, but her favourite was the strawberry & especially the custard cream, and Mimi, she just ate the strawberry... -_-"
So here as originated from Ann Chin from Baking Wonderland:
(I have stated the English Version, not sure if they are correctly translated... hehehehe... pardon me...:-p)
北海道蛋糕食谱~Hokkaido Cupcakes Ingredients:
A = 牛奶(Milk) 135克,植物油(Canola Oil) 45克,幼糖(Sugar) 30克。
B = 低筋面粉(Cake) 135克。
C=蛋黄(Egg Yolk) 135克。
D= 蛋白(Egg White) 270克,幼糖(Sugar) 60克,塔塔粉(Cream of Tar Tar) 1/2tsp。

做法:[METHOD]1.将A煮至热(不需要滚),把低筋面粉加入拌匀,待凉后再加入蛋黄,要一边搅拌一边加入, 然后放一边待用。(Cook A in low fire(warm-do not need to be boiling stage), add in the B and mix well. After the batter has cooled, add in the egg yolks while whisking. Leave it aside for later use.)2. 把蛋白打至发泡加入半份白糖和塔塔粉,继续搅拌至蛋白呈现细腻才加入剩余白糖,
继续打至硬性发泡即可。(Beat egg white with cream of tar tar & sugar till stiff peak forms)
3. 把2/4蛋白加入蛋黄糊里搅拌均匀,再倒回剩余蛋白里,轻轻拌匀即可。(Add 2/4 of the meringue into the egg yolk batter, mix well. Pour mixed batter into the remaining meringue and mix until well combined)
4. 把面糊舀入纸杯里,7/8分满就好,然后以预先预热上下火180度的烤炉里,烤约15 分钟或至熟即可!(Pipe the batter into the cupcake cases till 7/8 full. Bake in a preheated oven of 180C for about 15 mins)
5. 待凉后才挤入香草奶油馅和装饰,然后冷藏才好吃的!(Once cooled, pipe in the vanilla custard cream into the Hokkaido Cupcakes and decorate as desired. Dust with icing sugar for the finishing touch. Chilled the Hokkaido Cupcakes as they are best eaten chilled:-D)
分量可做19个 (Recipe can yeilds about 18-19 cupcakes) 
自制卡仕达酱(香草奶油馅)(Vanilla Custard Cream)材料A:
蛋黄(Egg yolk) 45克
幼糖(Sugar) 40克
材料B:
低筋面粉(Cake Flour)10克
玉蜀黍粉(Corn Flour) 10克
材料C:
牛奶(Milk) 250克
幼糖(Sugar) 10克
香草精(Vanilla Essence) 适量(I use about 1.5 tsp)
材料D:
牛油(Butter) 20克
材料E:
Topping cream 100克
做法:[METHOD] 1. 将材料A打至浓稠(蛋黄颜色变白 ) (Beat egg yolks & sugar until white & creamy)
2. 加入材料B拌匀,备用。 (Add in B until well combined. Keep aside)
3. 将材料C煮滚,熄火,在把一半份量倒入2里,要一边搅拌一边倒入
然后把以上混合物筛过后倒入剩余的热牛奶里搅拌均匀 (Boil C. Pour half of the boiling milk mixture into the egg yolk batter. Mix well and pour it back into the balance milk and mix well.
4. 继续用小火把以上混合物煮至浓稠即可,熄火后趁热加入牛油拌匀。(Continue to boil the milk mixture over low fire, stir till you get a thick consistant texture. Turn off the fire and stir in the butter till melted.)
5. 用保鲜膜盖在蛋奶酱上面防止表层结皮。待凉备用。(Use a cling wrap to cover the custard cream to prevent surface from skinning. Keep aside)
6. 最后,把材料E搅拌至看见纹路(类似湿性发泡)后,把它加入蛋奶
酱里拌匀再冷藏,就变成美味的自制卡仕达酱。(Lastly, whipped the topping cream till peak forms. Mix it together with the custard cream. Keep chilled before piping it into the cupcakes)
  
 So try these Hokkaido Cupcakes now!!!!

Friday, October 12, 2012

Apple Crumble Cupcakes / Cake

I had came across Kit's blog and her Apple Crumble Cake simply caught my attention. And I knew this is one of the cake I needed to bookmark and try to bake it...
And I wasn't wrong about it. These Apple Crumbles were indeed delicious...
I had made these Apple Crumble in cupcakes and a loaf of cake.
The texture of these apple crumbles were simply excellent!!! A soft and fluffy texture was all I knew the moment when I tried them.... Yummy indeed. Mimi had shared half of a cupcake with me, while Nic whom initially refused to try, said it was delicious too. I think these apple crumble will made one of the kids favourite as well. Even my colleagues whom had tried it, said it was very soft and delicious too.
 So what are you waiting for???
 This recipe yeilds 6 normal cupcakes and a 6"x3" rectangular loaf.
 Thanks to Kit for sharing this wonderful recipe:)

Recipe as adapted from I-Lost in Austen
Ingredients:
2 apples –cored & diced
60g ground hazelnut (ground almond)
80g raisins
3 eggs
140g  salted butter (room temperature)
130g powdered sugar (I use 100g)
200g flour + 1 tbsp
1 tsp baking powder
Rectangle baking pan

For crumble:
50g flour
30g cold salted butter
40g hazelnuts (chopped blanced almonds)
30g sugar


Method:
1. Greased  baking pan or muffin tin.
2. Combine flour & baking powder. In a large bowl beat butter & sugar till creamy. Gradually add in eggs , one at a time & hazelnut with flour mixture till well combined.
3. In a bowl toss to coat  diced apples & raisins with 1 tbsp of flour . Add in batter & stir till well combined. Pour batter in baking pan.
4. Preheat oven to 160°C. For crumble: In a bowl combine butter, sugar , ground hazelnut & flour. Cut the butter in with your fingers till mixture forms crumbs. Topped crumble mixture on batter evenly & bake for 1 hour.

Friday, September 7, 2012

Ladybugs Attack!!!! - Steamed Strawberry Cupcakes

I came across these adorable ladybugs steamed cupcakes from Mui Mui's blog, My little Favourites DIY. I had bookmarked this recipe from her. It was a definitely must-try recipe as the steamed cupcakes are simply so irresistable and interesting... Wouldn't you think so too???
 Last Sunday I was bounded at home as my air-conditioner needed a completed clean-over... Going through my bookmarked recipes, this recipe caught my attention... I finally bucked up myself and started trying out this recipe when the servicing of the air-conditioners went on...
Nat was pretty excited with the makings of these cupcakes as she said that the cupcakes are so pretty..
Below pictures shows the step by step of how you should pipe the pictures of these ladybugs. It was quite a challenge initially, but I found fun piping the colors for the ladybugs.

It was really a great achievement seeing the cupcakes rose up nicely, with the laybugs pictures... I was pretty excited seeing them...Taste wise???? They tasted very much like 鸡蛋糕. Soft & smooth texture of these cupcakes.. What about my gals???
Oh.... what have we here????
An odd little ladybug amongst the rest of the pink ladybugs...


And I can't help taking so many pictures on these adorable steamed ladybugs cupcakes!!!!
Nat & MiMi liked the cupcake very much, whereas for Nic did not fancy them at all... I had brought some to my office and everyone were as fasinated as me... hahahaha...

Here is the recipe originated from Mui Mui's blog 

Ladybug Steam cupcake
Ingredients:
3 cold eggs
275g plain flour
3 tsp baking powder
150ml fresh milk
1 tsp ovalette
220g castor sugar
1 tsp vanilla essence

Method:
1) Put all the ingredients ina mixing bowl and beat with medium high speed for 6 minutes.
2) Take 1 tbsp plain mixture and put into a piping bag. 
3) Take 3 tbsp plain mixture, mix with brown colouring and put into piping bag.
4) Colour the rest of the mixing with bright red and filled into a piping bag.
5) Pump the red into a paper cup about 8% full. Draw a cross with the brown mixture and do dots on both sides.Colour the upper half of the cross brown and make 2 plain dots for the eye and fill the inside with the plain mixture.
6) Steam with meduim high heat for 12 minutes.